
The market is full of smart thermostats that can be either voice-controlled or through an app. You can simply adjust the temperature of your surroundings without even lifting your finger.
But not everyone needs a fancy thermostat to control their home’s temperature. Even a $30 thermostat can do the job for you. If you aren’t a fan of using a thermostat through its app or voice commands, you can settle for a cheaper option. One such thermostat is the Honeywell T4 Pro.
At the time of writing this article, the Honeywell T4 Pro is available on Amazon at a price of $37. It is a simple, easy-to-use gadget that allows you to regulate your home’s heating and cooling.
That said, we have written a detailed review of the Honeywell T4 Pro so you can decide whether to buy this thermostat or not. Let’s get started.
Honeywell T4 Pro: What’s New
The T4 Pro is a part of the Honeywell Home T Series of thermostats, with the ability to create a separate schedule on weekends, to simplify everything from installation to user experience. The T4 Pro has push-button control and seven-day scheduling. Its adaptive intelligent recovery helps you feel more at ease faster by understanding how long it takes your system to achieve a target temperature and turning it on sooner.
Here are the key specifications of the Honeywell T4 Pro:
- 6.2 x 5.2 x 2.3 inches
- 7-day programmable thermostat
- White color
- LCD screen
- Heating and cooling control functions
- Supports both C-Wire and batteries for power
In the box, you’ll get a T4 Pro thermostat, UWP mounting system, decorative cover plate, screws, anchors, 2AA batteries, and an installation guide.
Design and Display
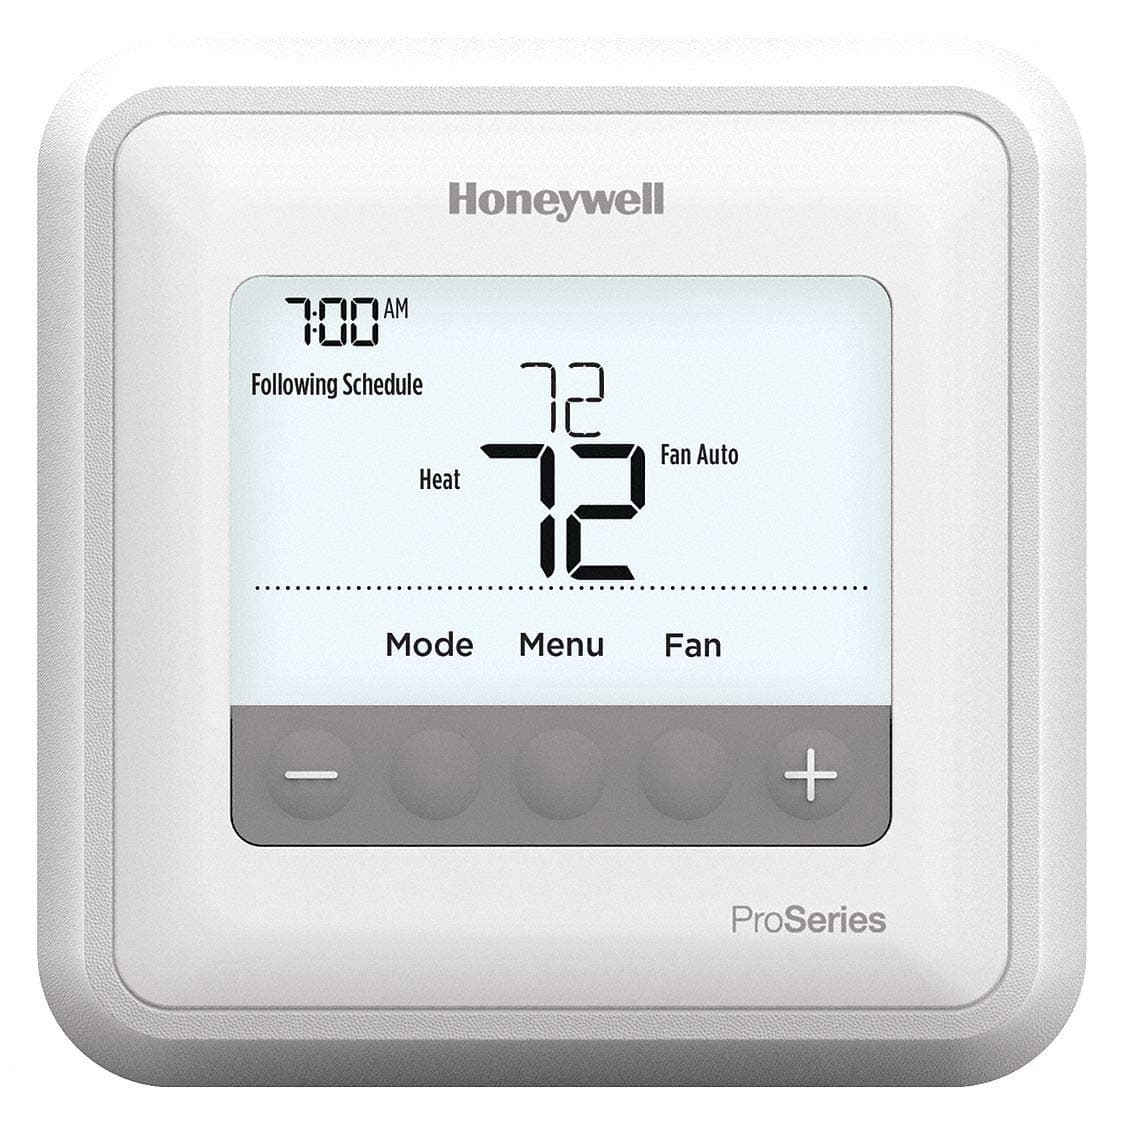
The Honeywell T4 Pro is a square-shaped thermostat with round edges that measures 6.2 x 5.2 x 2.3 inches. It comes with a large LCD screen with ‘+’ and ‘-’ buttons at the bottom to raise or lower the temperature of your home. The simple white color works well against the wall.
The display is pretty large with bigger black fonts that make it easy to read from a fair distance. At the front, you have an actual temperature indicator displayed on the screen. The rest of the options like time, schedule information, and system status information are also present.
Overall, the design and display of the Honeywell T4 Pro are fine and simple.
Features
The Honeywell T4 Pro is a programmable thermostat with loads of features. You have the option to configure the thermostat to be non-programmable, 5-2, 5-1-1, or 7-day programmable, which sounds good as different people have different needs.
Each day, four-time periods can be programmed, with different settings for weekdays and weekends. We recommend the pre-sets since they can help you save money on heating and cooling.
- Wake – Set the time and temperature for when you want to get up and when you want to depart for the day.
- Away – Set the time you want to leave and the temperature you want to be at while you’re gone (usually an energy-saving level).
- Home – Set the timer for when you get home and the temperature you want for the rest of the evening until bedtime.
- Sleep – Set the time you want to go to bed and the temperature you want your room to be at overnight (usually an energy-saving level).
The T4 Pro thermostat learns how long your system takes to achieve the temperature you desire over time. It turns on the heating or cooling system earlier than normal to make sure you feel convenient when you want to be.
It takes effort to keep track of your daily schedule, but with the T4 Pro Programmable thermostat, you can set and forget about your home’s temperature. Whether you’re awake or asleep, whether home or abroad, program a seven-day plan or create alternative timetables for the weekend so you can always be comfortable.
With on-screen menus that display installation steps and a universal mounting method, the T4 Pro thermostat is simple to install. It’s even easy to use with simple push-button controls that let you change the temperature or set a heating and cooling plan.
The T4 Pro comes with built-in compressor protection. If the compressor is restarted too soon after it has been turned off, it might cause damage. This feature makes the compressor wait a few minutes before resuming operation.
The words Cool On (or Heat On if you have a heat pump) will appear on the display during the waiting period. The notification stops blinking and the compressor starts on once the safe wait period has passed.
The T4 Pro thermostat also supports installation with an optional C-Wire so you don’t have to rely on batteries every time. But if your house doesn’t have a C-Wire, batteries are necessary.
Normally you should replace the batteries on the thermostat once a year. If the low battery indicator shows, it should be done right away. The best thing is you’ll be notified two months before the batteries run out.
The time and day will not have to be reset if the batteries are placed within two minutes. The rest of the settings are saved in memory and do not require battery power.
Installation and Setup
Installing the Honeywell T4 Pro is easy and doesn’t take much time to get it done. Though professional help is always recommended for those who haven’t done this before, the below-mentioned steps can guide you on how to install the thermostat (if you are willing to do it by yourself).
Here’s how you can install the Honeywell T4 Pro thermostat in your home.
Step 1: Turn off the power to your old thermostat at the breaker box that controls your heating/cooling system. It ensures your device’s safety.
Step 2: Check if the power is really turned off. To do that, try changing the temperature in your old thermostat. If you don’t hear any sound of the system turning on after 5 minutes, it means the power is off.
Step 3: Now remove the faceplate of your old thermostat, either by gently pulling it off or grasping it. Don’t remove the wires from your thermostat yet.
Step 4: This thermostat doesn’t work with a high-voltage system. If you are seeing 120/240V wires, it means the thermostat won’t work.
Step 5: Click a picture of your wiring for future reference. Make sure the letters are near the terminals where the wires will be placed. This will come in handy when it comes to wiring your thermostat.
Use the wire labels included in the package to mark each wire if the color of your wires has faded or if two terminals have the same wire color.
Step 6: Remove the jumpers as they are not required with the RTH6360 thermostat.
A jumper is a device that connects two terminals together. It might be a little staple or even a colorful wire, and it has to be removed before proceeding. Release wires from terminals with a screwdriver.
Step 7: Take note of the wires in the terminals and write down the color of the wires connected to the terminals. Note that the RTH6360 thermostat does not support L/A, S, or U terminals.
Step 8: Start disconnecting the wires from your old thermostat. Release wires from terminals with a screwdriver. When each wire is detached, use a wire label to identify it. The letter on the wire label and the letter on the terminal should match. Wrap the wires around a pencil to keep them from sliding back into the wall.
Step 9: Take the UWP mounting system or wall plate, included in the box, and insert the bundle of wires through the back of the UWP.
Step 10: Level the wall plate and mark the location where you want to place the anchors. Drill the holes and install the wall anchors.
Step 11: Connect the wires to the thermostat and carefully place them in their proper locations. Confirm the wiring by matching it with the picture of the wiring you clicked on your old thermostat.
Step 12: Use the supplied screws to secure the UWP. To ensure a secure fit on your wall, use all three screws. When you’re finished, close the door.
Step 13: Don’t forget that this thermostat runs on a battery. So insert two alkaline batteries in the back of your thermostat. If your house has a C-Wire, you can use that instead.
Step 14: Align the thermostat with the UWP and secure it with a hard click.
Step 15: Turn on the electricity to the heating/cooling system at the breaker box or switch.
The Honeywell T4 Pro thermostat is successfully installed and ready to use. You can set and schedule the temperature according to your needs. Use the ‘+’ and ‘-’ buttons at the bottom of the display to raise or lower the temperature of your house.
Not to mention that since the T4 Pro doesn’t have Wi-Fi connectivity, it can’t be controlled through an app. So the only option left is the physical buttons of the thermostat.
The Pros
- Price is cheap
- Large LCD display
- Easy to install
- Supports C-Wire
- Easy to use
The Cons
- Doesn’t have a Wi-Fi connectivity
- No app to control the thermostat
- No smart home compatibility
Should You Buy the Honeywell T4 Pro?
There’s no doubt that the Honeywell T4 Pro is a decent thermostat for a $37 price tag. It has some impressive features, is easy to install, and supports C-Wire for installation.
Though it doesn’t have Wi-Fi connectivity and can’t be controlled through an app, if this is what you are not looking for, the Honeywell T4 Pro can be the best bet for you. As simple as that, some people don’t need a fancy thermostat but a basic device to control their heating and cooling.
If you are of the same thought, we would recommend you to go for the Honeywell T4 Pro.
Comments are closed.