
For everyone looking to keep their house warmer more efficiently, and who loves the idea of being able to control their heating and cooling temperature from their smartphone, Heatmiser neoStat V2 is the ultimate home heating control system for your needs.
The neoStat operates on a mesh network, which means it can send and receive signals from other thermostats on the network. This signal is sent from thermostat to thermostat until it reaches its target. When compared to typical RF thermostats, this communication approach enhances the communication range while improving network stability.
So if you have been thinking of buying the Heatmiser neoStat V2, you can consider giving it a shot.
But again, to clear your ifs and buts, we have written a detailed review of the Heatmiser neoStat V2. With every aspect of the thermostat covered in detail, you can find out if it is worth buying or not.
Let’s get started.
Heatmiser neoStat V2: What’s New
The Heatmiser neoStat V2 is a 7-day programmable thermostat with lighted touch buttons that operates on 230v. The neoStat can be set to act as a programmed thermostat or as a timer, so if you want to regulate your towel rails or lighting, Neo has you covered!
You can control your heating from anywhere when paired with the neoHub (sold separately). When compared to previous RF systems, the neoStat is tethered to the heating appliance/zone valve while interacting with the neoHub using wireless Mesh technology.
Here are the key specifications of the Heatmiser neoStat V2.
- 3.3 x 3.3 x 0.5 inches
- 7-day programmable thermostat
- Glacier white color
- LCD screen
- Heating and cooling control functions
- Illuminated soft touch keys with proximity sensor
Overall, the Heatmiser neoStat V2 looks pretty good on paper with decent specifications.
Design and Display
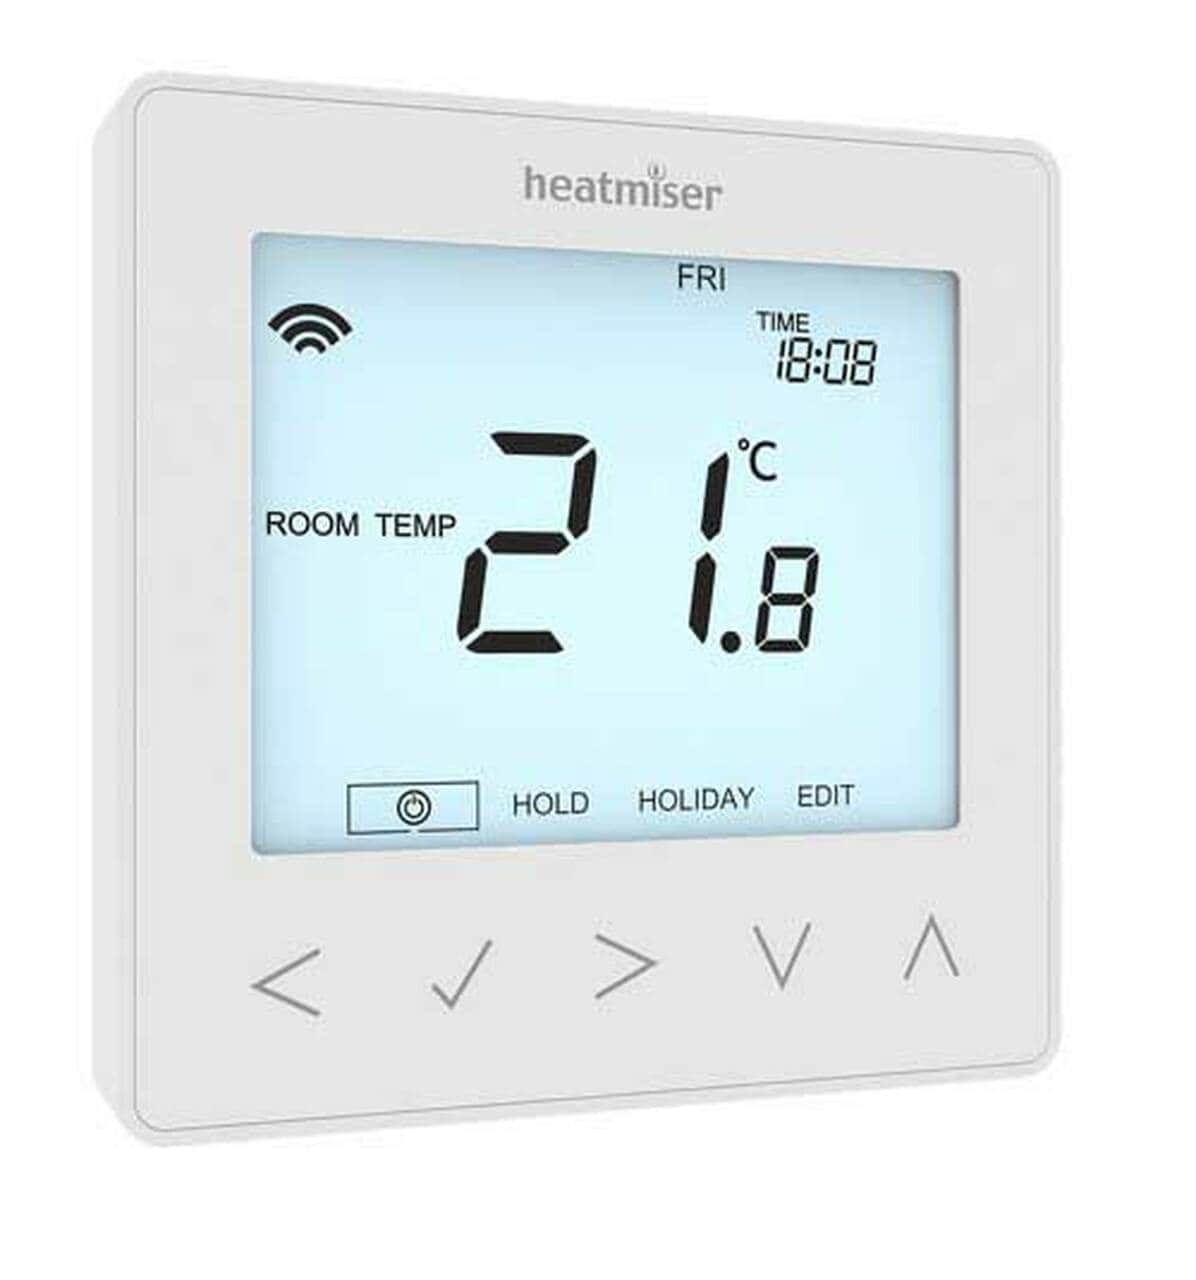
The Heatmiser neoStat V2 has done a great job in the looks department. The thermostat features a large LCD screen with dark black fonts so you can easily read it from a fair distance. The screen is not based on touch; instead, there are 5 illuminated soft-touch keys to adjust the temperature of your home. Measuring 3.3 x 3.3 x 0.5 inches, the neoStat V2 sports a square-shaped design with round edges.
On display, there are several indicators that represent different readings. For instance, the day indicator displays the day of the week, the mesh symbol displays when connected to the neohub, the main menu displays the currently selected option, and the floor/room temp indicates the displayed sensor mode.
That said, the Heatmiser neoStat V2 has a stunning design with the impressive display quality.
Thermostat Features
The Heatmiser neoStat V2 is equipped with decent features. Being a programmable thermostat, it allows you to choose when you want the heating to be turned on and what temperature it should attain when it is on. It will enable you to set different temperatures in your home at different times of day (and days of the week) to fit your specific requirements and interests.
There are three program mode options offered by the neoStat V2: Weekday/Weekend programming, 7 Day programming, and 24 Hour programming. The thermostat can also be used as a non-programmable thermostat. The program mode for the system is configured using the neoApp when thermostats are linked to the mesh network.
The thermostat is pre-programmed with comfort levels; however, these can be readily modified. The default times and temperature settings are: 07:00 – 21°C (Wake) 09:00 – 16°C (Leave) 16:00 – 21°C (Return) 22:00 – 16°C (Sleep)
The four comfort levels for weekday/weekend programs are the same for Mon-Fri but may vary for Sat-Sun. Each day of the week can have four distinct comfort levels for 7 Day programming. In 24 Hour mode, all days are designed with the same degree of comfort.
The holiday function in thermostat mode drops the fixed temperature in your house to the frost protection temperature setting. The thermostat will keep this temperature for the duration of your vacation and then return to the preset setting when you return.
When coupled with the neoHub, the wireless air sensor can be used to remotely measure the temperature from the neoStat or to take an average temperature in a bigger room. You may also utilize the door contact switch to have the heating turn off if a window or door is opened.
Even without a Heastmiser NeoHub, the Heatmiser neoStat can function as an ordinary, stand-alone, programmable thermostat or a timer.
To switch between thermostats or time clock modes, follow these steps.
- Use the Left / Right keys to scroll to clock mode.
- Hold down the Tick button for 3 seconds.
- SETUP will be highlighted, now press and hold the tick key for 10 seconds.
- To switch between modes, use the Left and Right arrow keys. Here, Mode 1 represents Thermostat and Mode 2 represents Time Clock.
- Press the Tick key to confirm the selection.
The thermostat will revert to the main display screen for the selected mode.
The neoStat V2 detects when you are going to utilize the touch keys by using proximity. The touch buttons and LEDs will light up as you approach the neoStat V2. This is handy if you need to change the temperature or timing in a dark environment.
Installation and Setup
The installation and setup of the Heatmiser neoStat V2 are easy and can be done on your own. You only need to take early precautions to ensure you don’t cause irreparable damage to the thermostat. In case you are facing difficulty installing the thermostat, professional help is recommended.
Here’s how you can install the neoStat thermostat in your home. Also, note that the neoStat V2 is flush installed and requires a 35mm back box to be sunk into the wall before installation.
Step 1: Remove the screw from the bottom face of the thermostat using a tiny screwdriver. Then carefully separate the front and back plates.
Step 2: Place the thermostat front in a secure location.
Step 3: Screw the thermostat back plate into the back box firmly.
Step 4: Clip the thermostat’s front plate to the rear plate and secure it with the retaining screw.
Regarding the wire part, it should only be done by a qualified electrician. Also, make sure, you aren’t installing the thermostat near a direct heat source like sunlight as it can affect the readings.
Once installed, you can now pair the neoHub with the neoApp and then connect the neoStat V2 to the neoHub.
Follow these steps to connect the neoHub to the neoApp.
- Connect the neoHub to your router using the included Ethernet connection.
- Connect the power supply to the neoHub.
- When the neoHub connects to your network, the router will immediately assign it an IP address, and the Link LED will turn RED.
- Once connected to the Heatmiser cloud server, the Link LED will turn GREEN.
- Connect your smartphone or tablet device to the same WiFi network as your router.
- Register an account after downloading the FREE Heatmiser neoApp from the Apple App Store or Google Play Store.
- After you’ve created your account, click Sign In, then Add Location.
- Press the connect button on the neoHub to add the location to your account.
- When you’ve successfully connected, give the place a name (e.g. Home).
The next step is to connect the neoStat V2 to the neoHub. We would recommend starting with the neoStat V2 located closest to the neoHub.
To add a neoStat V2, follow these steps:
- In the app, select ADD NEOSTAT, enter a preset or custom title, and then press NEXT.
- You have two minutes left to connect the neoStat V2 to the neoHub.
- On the neoStat V2, use the Left / Right keys to select, press, and hold Tick.
- SETUP will be highlighted, now press the tick key once
- Feature 01 is displayed on the screen.
- Press the Tick key once again to pair the neoStat to the neoHub
- The MESH symbol appears flashing on the display.
- When the neoStat V2 successfully connects to the neoHub the
- MESH symbol will be permanently displayed.
- Press ADD ANOTHER to add other zones or FINISH to finish the configuration.
Once completed, you are now ready to use the neoStat V2 thermostat.
The Good
- Stunning design
- Large LCD display
- Four comfort levels per day
- Flush mounting
- Compatible with 10K, 12K, and 15K NTC Floor Probes
The Bad
- Quite expensive
- Needs professional assistance
Should you buy Heatmiser Neostat V2?
No doubt that the Heatmiser neoStat V2 offers decent features looks great and is easy to use and install. With the help of neoHub, you can control your room and floor heating temperature from anywhere. It is the most flexible smart room thermostat solution on the market today, allowing you to control your home temperature, and has been proven to lower energy bills.
if budget is your main concern, you can consider other options too. There are plenty of programmable and smart thermostats available in the market at a cheaper price. However, the neoStat V2 thermostat clearly justifies its price tag and gives the best return on investment at this cost.
That said, if you are looking for a programmable thermostat with decent features, a stunning design, and plenty of modes, then the Heatmiser neoStat is the best bet for you.
Comments are closed.